Hi,
The image at left side when divided into 9 patch will look like the image at the right side. Now the interesting part, the four corners of the image will be remain unscaled and the edges will be scaled in single axis, which may be X or Y. and the center of the 9 patch image will be scaled in both axis. Now we include an image which will represent the parts of image unscaled, scaled into Y axis and scaled into Y and scaled into both direction with color differentiation. Here it is.
Consider the preview portion, first preview (circled with blue line) is scaled in Y axis and second (circled with blue line) is scaled into X axis and third one is scaled into both axis. You can see the way these images are now scaled is not looking good, and will cause weired results, Lets make it 9 patch. draw9patch automatically add 1 px to every side of the image, so that we can draw patch. 3 things to keep in mind while drawing patches.
By default the "Show Patches" checkbox is un-selected, so you can't see the light green bars showing the area for both side patches, unless you check the "Show Patches".
By default content preview is also not shown, you have to check the "Show Content" check box. Adjust the padding of content inside the image according to your desire.
Nice??
Now save it in your drawable folder and use it in your android project.
That's all. Now its your turn to roll with it. ;)
In the next post we have discussed, how to use these 9 patch speech bubble in a ListView for android.
2nd blog post after almost 1.5 year :)
Today I'm going to discuss about 9 patch image and how to use 9 patch png in android apps.
What is 9 patch?
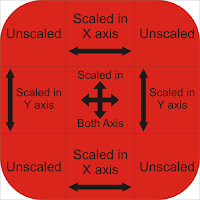
9 patch is technique used to scale the image in such a way that the 4 corners remain unscaled, but the four edges are scaled in one axis and the middle is scaled in both axis. So the graphical representation of this scenario will be something like this:
 |
| Icon when divided into 9 patch |
 |
| Simple Icon file |
The image at left side when divided into 9 patch will look like the image at the right side. Now the interesting part, the four corners of the image will be remain unscaled and the edges will be scaled in single axis, which may be X or Y. and the center of the 9 patch image will be scaled in both axis. Now we include an image which will represent the parts of image unscaled, scaled into Y axis and scaled into Y and scaled into both direction with color differentiation. Here it is.
 |
| 9 patch parts represented with colors. |
In the above image the bluish area will be scaled in X axis and the yellowish area will be scaled in Y axis and the greenish area will be scaled in both X and Y axis. So when the image will be converted into 9 patch png, it will be scaled by Android framework automatically, Here is graphical representation of how the above image will be scaled.
 |
| 9 patch image scaled in both X and Y directions. |
Interesting?
So we learned what is 9 patch, the next move is how to roll with it?
Designing images
First you will make your 9 patch image, you yourself have to decide about width and height of the image. Keep in mind while working with Android, you have to provide different screen sizes' graphics like, xhdpi, hdpi, mdpi, ldpi (many more). Here are some links to how to design graphics.
- Supporting Multiple Screen
- Icon Design Guideline
- HotVerySpicy's very helpful post here.
Android have provided 9 patch image editor to edit the png image and convert it to 9 patch image, Android's documentation about 9 patch can be found here.
First we will take our png image, which looks like this.
For the convenience, I've made 4 directories named, drawable-mdpi, drawable-hdpi, drawable-ldpi and had copied my PSD design file into relevant folder and scaled them according to rules discussed in Android's documentation. Now I got all the images designed, and it is time to convert them to PNG.
draw9patch Editor
Now we play with 9 patch editor, go to your android-sdk home > tools > draw9patch. if you are working on Mac, you can start it with double click, on Linux it can be run as shell script and Windows users can also run it by double click the draw9patch.bat (the extension can be .jar too, which can be run by Java Runtime Environment JRE). Now drag your png image file into the window and your can follow the old school way by going through File > Open.
 | |
| Default screen of draw9patch |
Simple? eh?
Now we are going to add a png file to edit it.
Consider the preview portion, first preview (circled with blue line) is scaled in Y axis and second (circled with blue line) is scaled into X axis and third one is scaled into both axis. You can see the way these images are now scaled is not looking good, and will cause weired results, Lets make it 9 patch. draw9patch automatically add 1 px to every side of the image, so that we can draw patch. 3 things to keep in mind while drawing patches.
- Top and Left side drawings determine the patches (Area from where to scale)
- Bottom and Right side drawings determine the contents area. (padding or the area which will be occupied by contents)
- You draw path with left click (hold) and drag, and remove path with holding shift and click and drag or right click and drag.
Drawing Patches:
Here is the screenshot of patch drawings:By default the "Show Patches" checkbox is un-selected, so you can't see the light green bars showing the area for both side patches, unless you check the "Show Patches".
Drawing content area
By default the whole image's area is considered content area, but we need to draw that too otherwise we have to manually set the padding of the View which is using this image as background. Here is how to do it:By default content preview is also not shown, you have to check the "Show Content" check box. Adjust the padding of content inside the image according to your desire.
Nice??
Now save it in your drawable folder and use it in your android project.
That's all. Now its your turn to roll with it. ;)
In the next post we have discussed, how to use these 9 patch speech bubble in a ListView for android.


Thank u it is very helping
ReplyDeleteawesome man , have got the page book-marked will use it some day.
ReplyDeleteSuperb to the power of superb.
ReplyDeleteVery helpfull and nice
ReplyDeleteShahzada.....
ReplyDeletevery helpful....finally i m getting it...thanks a ton..
ReplyDeletevery helpful....
ReplyDeleteThanks a lot man. I have read many tutorials but could not understand properly. This is very basic and helped me a lot.
ReplyDeleteWhy do people use 9 patch with Android?
ReplyDeleteBecause it helps to support multiple screen sizes and helps you decrease the image sizes which in tern saves you some MB of space/size in your app's APK.
DeleteAdding to Adil,'s comment, sometimes when you don't do 9-patching, it looks like Mario came by and stomped and squashed the asset like a Gooba Mushroom. 9-patching helps prevent the asset from looking like this in an app
DeleteJoe, that's some awesome explanation I've seen in some time. Happy Coding!
Deletenice tutorial... it's very helpful....
ReplyDeleteThanks for your tutorial! Very helpful!
ReplyDeletewoow.... good one..
ReplyDeleteCan any one tell how to change .9.png image color in draw9patch.bat
ReplyDeleteIf you are talking about the color used in graphics of image, you need to use any image editor, like photoshop, gimp. draw9patch.bat is only mean to be used for converting finished image into 9 patch. Let me know if it makes sense.
DeleteIs it possible to change the color programmatically? For example in case of different color themes - instead of adding a set of 9.png in different color/ I haven't found a way so would appreciate the help.
DeleteAndrew, it depends on how complex your desired background is. If its a basic shape like rectangle, oval then you can use android shape drawables, they're really nice.
DeleteIf you're trying to make speech bubble, then custom drawings is the way to go. Here're the android custom drawings documents:
1. Custom Drawing
2. Canvas and Drawables
Very helpfull and nice
ReplyDelete